Categories
Arts

Things to Eat: Garlic Scape Pesto


How ironic that I wrote this piece on the same day as the National Day of Garlic, the feature food of my article.

Garlic, a relative in the onion family and native to central Asia, has been consumed by humans for more than 6,000 years. Known for its medicinal qualities, garlic has been used over the centuries for currency, to ward off evil spirits, as an aphrodisiac, and more.  Most commonly it has been used as a seasoning that is a frequent flavor booster in world cuisines.

As a self-proclaimed “foodie,” I have been using garlic in savory dishes since I can remember learning to cook. But it wasn’t until a few years ago that I discovered that you could use more than the bulb of the garlic plant.  Garlic “scapes” were introduced to me by my son, Andrew, who did an internship four years ago at a sustainable agriculture center in upstate New York.

The scape, or garlic curl, represents a stage of growth common to the hard-necked variety of garlic.  As the underground bulb grows and begins to harden, the plant sends up a dense green shoot the consistency of asparagus that curls as it grows longer.  Snipping off this curly shoot (the scape) at this stage, before it produces a flower, allows the garlic bulb to grow larger.

Garlic scapes are considered a vegetable and have a mild garlicky flavor.  While my favorite way to use scapes is in the pesto recipe below, it can be used in hummus, sliced thin and sauteed, and even added raw to salads, and other vegetable dishes.

Garlic Scape Pesto

1 cup garlic scapes (8 or 9 scapes), chopped (remove flowering end)

1⁄3 cup walnuts

3⁄4cup olive oil

1⁄4to 1⁄2 cup grated Parmigiano-Reggiano cheese

1⁄2 teaspoon salt, or to taste

Ground black pepper

Mix all together in a food processor and blend to a fine consistency.

The pesto is delicious tossed with warm pasta or spread on as the bottom layer on a pizza before adding other toppings.

You can freeze the pesto or refrigerate it for up to one week.

Garlic scapes usually appear for a few weeks in late spring or early summer at local farmer’s markets.  Doug and I planted our first crop of garlic last November and today the plants are several inches out of the ground.  I will be watching for our own scapes and also at the markets again this summer so that we have a fresh batch of pesto in the freezer for use next winter.

Categories
Arts

Things to Eat: Guacamole

Guacamole.  For those of you who read my last article, forgive me for writing one more time about my love of Mexican food. I just could not pass up the opportunity to highlight one of the best culinary treasures on earth.

Courtesy of Gabe Jacobsen

Guacamole can be simple, made with avocados, salt, and a little bit of lime, or it can be highly complex filled with various spices, fruits, nuts, herbs and even bacon (there are lots of variations to be found on the internet)!  It is equally diverse when served at home as an appetizer with chips or vegetables for dipping or as a condiment on an endless supply of different main dishes.

This week I am offering up an approximation of my typical recipe (I usually don’t measure) and will even provide some suggestions for ways to spruce it up if you want.  Samples will be available in the Office of Student Life on Monday until it runs out!

Ingredients:

  • 2 medium sized avocados (the best way to tell if they are ripe is if you push on them and there is a slight give – you want them to be a little bit soft, but not mushy or brown)

  • 1 clove garlic (fresh is best)

  • 1/2 jalapeño, finely diced (you can vary the heat level by using more, less or removing the veins and seeds inside the chile)

  • 1/2 cup chopped cilantro

  • 1/3 cup finely chopped onion

  • 1/2 teaspoon salt (plus more to taste)

  • 1/4 teaspoon fresh ground pepper

  • juice from 1/2 small lime

Directions:

Take 1 teaspoon onion, the clove of garlic, jalapeño, salt, pepper, lime juice and a good pinch of cilantro and put it in a blender (you can do this in a mortar and pestle or chop all the ingredients finely and try to mash them with a fork if you don’t have a blender.)  Blend until smooth.  Open the avocados by cutting lengthwise around the pit and pulling the two halves apart.  You can remove the pit by gently hitting the pit with the knife and then pulling the pit out.  With your knife, carefully cut a crosshatch pattern in each of the halves of the avocado and scoop the cubes out into a bowl with a spoon.  Pour the blended mixture over the avocado and gently toss to coat all the pieces evenly.  Add remaining cilantro and onion to the bowl and mash the avocado to your preferred consistency (I like mine to have some texture to it).  Add more salt to taste if you think it needs it.

If you want to try something different, you can add mango, papaya, peaches, or strawberries for a more tropical feel. Or, as I mentioned above, you can add bacon (think B.L.T. with avocado here and it doesn’t sound so weird).  Enjoy!


Things to Eat: M&M Cookies

Just a few years ago, I had never baked anything from scratch without my mom directing each step. But I discovered that I could appreciate baking when I came to college. It is the best way I have found to relax and de-stress.

Courtesy of Laura White

My Sunday afternoons are typically spent baking. It is not unusual for me to show up to class with a plate of cookies still warm from the oven. People will not be at my house long before I offer them something I have recently made. The ultimate reason that I love baking is how it connects me to people. Food has a unique power to bring people together. More than anything else, I love to share everything that I make with others. For me, the best way to express that I care about people is by giving them something that I have made.

I enjoy baking because it’s more methodical and precise than cooking. There are “rules” in baking. These rules do not take creativity out of baking, though. I like to tweak, and create, recipes using what I know about the science behind baking. Here are a few tips I have learned to keep cookies soft and chewy, as opposed to crunchy and crispy:

  • Cookies should have more brown sugar than white sugar. The molasses in brown sugar keeps them soft.
  • Egg yolks keep cookies soft, while egg whites get crispy. That is the reason why some recipes call for an extra egg yolk.
  • Cornstarch keeps cookies soft.
  • Chill your dough for at least an hour before baking. This is my least favorite part, because who wants to wait for their cookies? But chilling the dough prevents spreading when the cookies are baked.
  • Take cookies out of the oven before they look completely done. They continue to bake and set on the hot cookie sheet even when they are out of the oven.

M&M Cookies

  • 1 cup (2 sticks) butter, softened
  • ¾ cup brown sugar
  • ¼ cup white sugar
  • 1 egg plus 1 egg yolk
  • 2 tsp. vanilla extract
  • 2 cups flour
  • ¼ cup cornstarch
  • ½ tsp. baking soda
  • ¼ tsp. salt
  • 12-ounce bag of M&Ms

Beat the butter and sugars until well combined using a mixer. Add the eggs and vanilla. Mix in the flour, cornstarch, baking soda, and salt until just combined with a wooden spoon. Add M&Ms.

Chill the dough (overnight is best).

Preheat oven to 375 degrees. Roll cookies to desired size and place on ungreased cookie sheets. Bake for 7-10 minutes until the edges are golden brown.


Things to Eat: Salsa

For those who know me well, it is no secret that I love Mexican food.  I was raised in Southern California, where you could usually find one or more small taco shops on every commercial block.
I also grew up with my grandfather, who was born in Baja California and spent all of his life between Ensenada, San Diego, and Los Angeles.  He was famous for his taco parties and we usually had some sort of Mexican fare when we gathered for holidays as a family.  

Courtesy of Gabe Jacobsen

While it is almost impossible to tell that I am of Mexican descent from looking at me (the other three-quarters of my lineage is Norwegian and a mix of Western European roots), the food that I ate growing up has become a strong part of the way that I connect to my sense of home and family while living so far from my birthplace.  I have a penchant for acquiring Mexican and Latin cookbooks (we have over 40 at home at the moment!) and have invested a lot of time in my kitchen in pursuit of learning how to make some of my favorite dishes.

One of my favorite aspects of Mexican cooking is making salsas.  There are endless varieties.  They can be simple or highly involved in preparation, can range from mild to devastatingly hot, and serve to give anything routine from beans and rice to more substantial fare like tamales or chilaquiles (one of my favorite ways to use leftover tortillas) an extra level of nuance, contrast and complexity. Changing the type of salsa you add to a dish can vastly change its flavor and gives the cook a limitless variety of options in changing the flavor profile of your food.

Below is one of my favorite salsas that I make on a regular basis at home.  It also happens to be one of the easiest. If you would like to try the salsa before making it, samples will be available while supplies last in the Student Life office on Monday. Do remember that the quality of your ingredients will always directly affect the way your salsa turns out.  Make sure everything is fresh, if you can help it!

Ingredients:
8 oz. (1/2 pound) fresh tomatillos, quartered.  They look like green tomatoes, have a papery husk around them, and can be found in many grocery stores (Wegmans, the Cuba Giant, Tops are all local options—even the Co-op had them over the summer).
2 tbs white onion
1 clove garlic
1 ½ tsp course kosher salt or ¾ teaspoons table salt
Pinch of fresh ground pepper (pre-ground, if you must)
½ cup fresh cilantro
¼ to 1 whole habanero pepper, depending on your tolerance for heat.  Jalapenos are easier to find and can be substituted, but do change the flavor of the final salsa quite a bit.
Juice from ¼ of a lime (optional)
2 whole allspice berries

Directions:
Put all ingredients in a blender (tomatillos should be placed at the bottom) and blend until smooth.  The tomatillos may take a moment or two to catch in the blades, but don’t add water!  Just wait until everything is blended together.  Pour into a bowl and enjoy with chips or on some good Mexican food!

Categories
Arts

Things to Eat: Ajvar

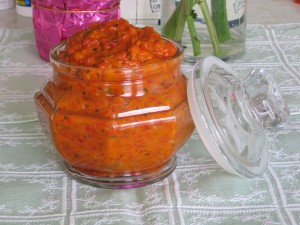
Ajvar (pronounced “eye-var”) is a roasted red pepper and eggplant relish commonly found across the Balkans. I first discovered ajvar when I was in the Balkans for the semester last fall. The best way to describe it is as a variant of salsa, only less spicy and more savory and tangy. Ajvar can be used as a dip for grilled meats (quite commonly with cevapi, a type of kebab) as well as used in pasta or as a spread on bread. As the semester progressed, one of my mealtime mainstays became ajvar with feta cheese and olives on a slice of freshly baked bread.

Courtesy of http://easteuropeanfood.about.com/

I have missed ajvar very much since returning to the United States and so, a few weeks ago, I attempted to make a batch of it myself. The process of making ajvar requires much labor. Not only do you have to cut and roast the vegetables, you must also peel the skins off the hot peppers (quite a mess that stains your hands), scoop out the flesh of the eggplant and pick out the larger seeds, mince the garlic, and mix it all together with vinegar to taste. And it requires extra work without a food processor. However, for me the results were quite satisfying – even though it was prepared by the clumsy hands of a non-Balkans native. My craving for ajvar was appeased. The work was worth it.

A key thing to remember in making ajvar is to not be afraid of blackening the skins of the peppers as you roast them in the oven. Part of what makes ajvar so tasty is its texture; it is silkily smooth. Achieving this is only possible by being sure that the peppers are roasted long enough that their skins are black and they are cooked all the way through.

Ingredients
-6 medium red bell peppers
-1 small eggplant
-Minced garlic
-Vinegar
-Olive oil

Recipe
1)   Preheat the oven to broil.
Halve the peppers, seed them, and place on baking sheets. (Older baking sheets, if you can.)
3)   Cut the eggplant in half, place it on baking sheet, score it with a knife, and sprinkle with salt and olive oil.
4)   Put the peppers and eggplant in the oven to roast, about 15 minutes or until the pepper skins are blackened.
5)   Take the peppers and eggplant out of the oven when they are finished. Place the peppers in a bowl and cover with a dishcloth to cool. The steam will help their skins to loosen.
6)   While the peppers cool, scoop the eggplant flesh with a spoon and make sure to take out the larger seeds.
7)   When the peppers are cool enough to handle, peel the skins and place in separate bowl.
8)   If you don’t have a food processor, use a pastry cutter or two knives to mix together the minced garlic and eggplant.
9)   Add the peeled peppers to the garlic and eggplant mix and continue to either use the food processor or the pastry cutter.
10) After you have a relish-like consistency, add vinegar to taste. It helps to balance the strong garlic flavor. Add some parsley or chili flakes.
11) Congratulations! You’ve made ajvar!